Love this? Save it for later!
Share the inspiration with your friends
The holiday cookie swap at my office was in two days and I’d completely forgotten about it. Everyone else would be bringing those elaborate multi-day projects — you know the ones, with the homemade caramel and the tempering and the layers that take a whole afternoon. I had a half-empty bag of chocolate chips, a box of peppermint bark someone gave me last Christmas that I’d shoved in the back of the pantry, and about forty-five minutes before I needed to leave for my daughter’s school play. Honestly, I almost just grabbed a store-bought tin on the way out. But something stopped me — maybe stubbornness, maybe the fact that I’d already spent eight bucks on parking that week. I threw the peppermint bark into a bowl, crushed it with the bottom of a measuring cup (very professional, I know), and started creaming butter and sugar together with absolutely no plan. The cookies came out of the oven looking a little chaotic — chunks of red and white candy melted into the tops, some of them had spread too much, and I was pretty sure I’d overbaked one tray by a solid two minutes. But I brought them anyway, because what else was I going to do?
And then something wild happened. People actually stopped mid-conversation to grab another one. My coworker Sarah, who brings those perfect little French macarons every year, asked me for the recipe. The plate was empty before the store-bought tin even got opened. I stood there by the punch bowl, trying to look like I’d planned it all along, while inside I was thinking — wait, really? These messy little cookies with the crushed candy cane bits? These ones I threw together out of panic and pantry scraps? Yep. Those ones. I mean, let me tell you, I’ve never been so happy to be wrong about a recipe in my life.
That’s how these peppermint bark chocolate chip cookies became my go-to holiday showstopper. They’re not fancy. They’re not fussy. But they have this thing — that perfect combo of rich, melty chocolate and cool, crunchy peppermint — that just works. Maybe you’ve been there, scrambling for a last-minute contribution and praying it turns out okay. These cookies are your answer. They taste like you spent hours, but they come together in under thirty minutes. And honestly? They might just steal the whole dang table.
Why You’ll Love This Recipe
Let me tell you why these cookies have earned a permanent spot in my holiday rotation. I’ve tested this recipe at least seven times — yes, seven — tweaking the ratio of chocolate to peppermint, adjusting the bake time, and even trying different brands of peppermint bark. What I landed on is the version I’d serve to anyone, anywhere, without hesitation.
- Quick & Easy: These come together in about 25 minutes from start to finish. No chilling the dough, no complicated steps, no stress. Perfect for when you’re hosting a party and realize you forgot dessert.
- Simple Ingredients: You probably have most of this in your kitchen already — butter, sugar, flour, eggs, vanilla. The only special ingredient is peppermint bark, and you can find it at any grocery store during the holidays.
- Perfect for Holiday Gatherings: Whether it’s a cookie swap, a dinner party, or a festive get-together, these cookies look impressive and taste even better. They’re the kind of thing people grab first from the dessert table.
- Crowd-Pleaser: Kids love the candy cane crunch, adults love the sophisticated peppermint-chocolate combo. I’ve never seen anyone take one bite and not reach for another.
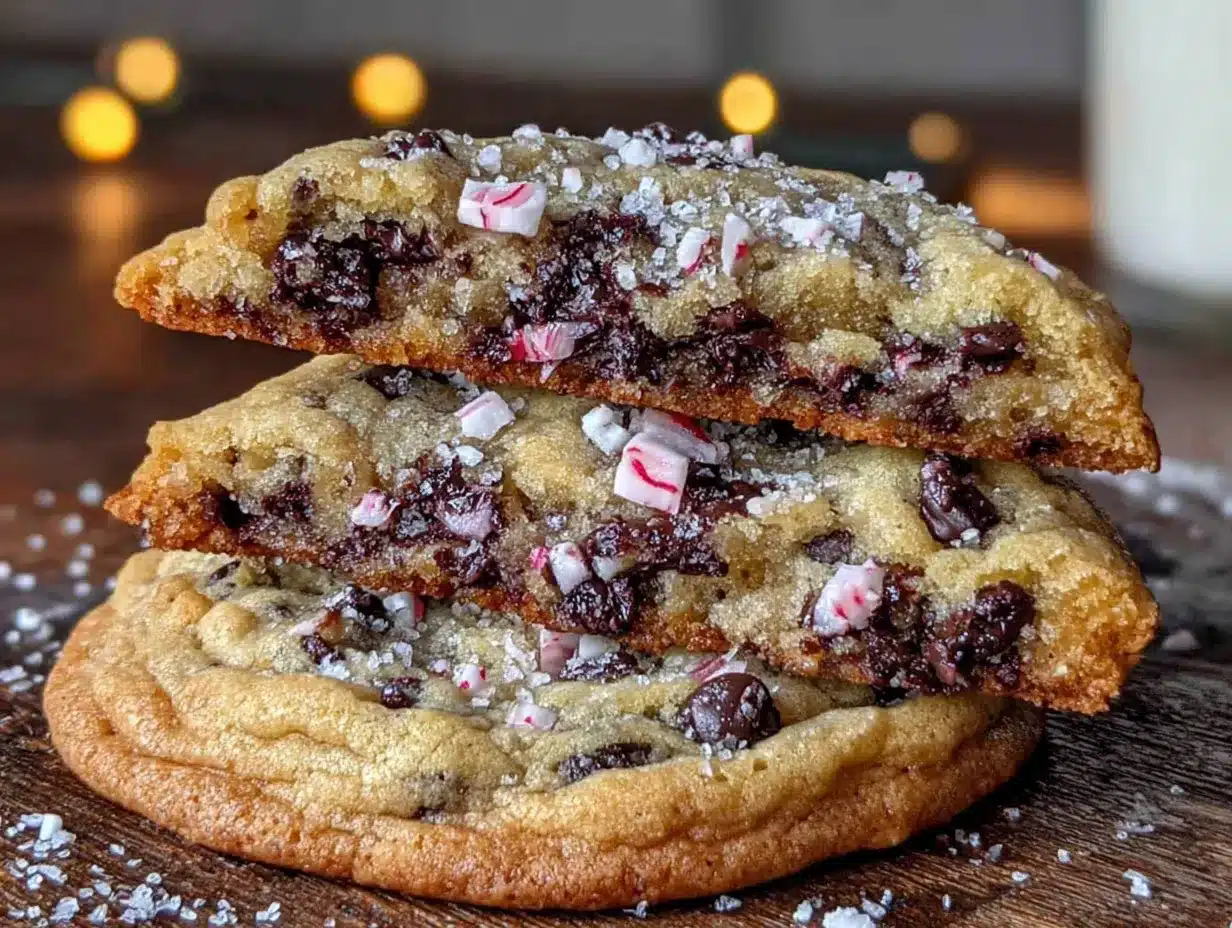
- Unbelievably Delicious: The texture is what gets me every time — soft, chewy centers with crisp edges, studded with melty chocolate chunks and crunchy peppermint pieces. It’s next-level comfort food in cookie form.
What makes this recipe different from the rest? It’s the way the peppermint bark melts into the dough as it bakes, creating little pockets of minty goodness throughout. Most recipes just sprinkle crushed candy cane on top, but I’ve found that mixing it into the batter gives you that perfect distribution of flavor in every single bite. Plus, using actual peppermint bark instead of just candy canes means you get that creamy white chocolate layer mingling with the dark chocolate chips — it’s a whole flavor experience, not just a gimmick.
This isn’t just another holiday cookie recipe. It’s the one that makes people close their eyes after the first bite. It’s comfort food reimagined — festive, indulgent, but somehow still simple. Perfect for impressing your guests without spending all day in the kitchen, or turning a casual gathering into something memorable.
What Ingredients You Will Need
This recipe uses simple, wholesome ingredients to deliver that bold holiday flavor and satisfying texture without any fuss. Most of these are pantry staples, and the few special ones are easy to find during the holiday season.
For the Cookie Dough
- 1 cup (2 sticks) unsalted butter, softened — I prefer using Land O’Lakes for consistent results. Make sure it’s truly softened to room temperature, not melted. (Trust me on this one — melted butter changes the texture completely.)
- 3/4 cup granulated sugar — Regular white sugar works perfectly here. It helps create those crispy edges we’re after.
- 3/4 cup packed light brown sugar — The brown sugar adds moisture and that slight molasses flavor that makes the cookies chewy. Dark brown sugar works too if that’s what you have.
- 2 large eggs, room temperature — Cold eggs can seize the butter mixture. Just leave them on the counter for 30 minutes before you start.
- 1 teaspoon vanilla extract — Pure vanilla extract makes a difference here. I’ve tried imitation and it’s just not the same.
- 2 1/4 cups all-purpose flour — Spoon and level your flour — don’t scoop directly from the bag or you’ll end up with dry cookies.
- 1 teaspoon baking soda — Make sure it’s fresh. Test it by dropping a little into vinegar — if it fizzes, you’re good.
- 1/2 teaspoon salt — I use fine sea salt. It balances the sweetness perfectly.
For the Mix-Ins
- 1 1/2 cups semi-sweet chocolate chips — Ghirardelli is my go-to brand. They hold their shape during baking and melt beautifully in your mouth.
- 1 1/2 cups crushed peppermint bark — This is the star of the show. Look for good-quality peppermint bark at stores like Target or Williams Sonoma during the holidays. You can also make your own if you’re feeling ambitious. (I’ve done both — store-bought is totally fine.)
- Optional: 1/2 cup white chocolate chips — I add these sometimes for extra creaminess. Not necessary, but a nice touch if you want more white chocolate in every bite.
Substitution Guidance
If you’re gluten-free, swap the all-purpose flour for a 1:1 gluten-free baking flour blend. I’ve used Bob’s Red Mill with great results. For a dairy-free version, use vegan butter sticks and dairy-free chocolate chips — just know the texture will be slightly different. And if you can’t find peppermint bark, you can crush up about 1 cup of candy canes and mix them with 1/2 cup melted white chocolate — let it set, then crush it again. It’s not quite the same, but it gets the job done in a pinch.
Equipment Needed
- Large mixing bowls (2) — One for dry ingredients, one for wet. I use glass bowls because they don’t retain smells.
- Electric hand mixer or stand mixer — A hand mixer works perfectly. If you’re using a stand mixer, use the paddle attachment.
- Baking sheets (2) — Rimmed baking sheets work best. I’ve had good results with Nordic Ware brand.
- Parchment paper or silicone baking mats — Silicone mats give you the most even browning, but parchment paper works great too.
- Measuring cups and spoons — Accurate measurements matter here, especially for the flour.
- Ziploc bag or rolling pin — For crushing the peppermint bark. A Ziploc bag and a heavy pan work just as well as a rolling pin.
- Cooling rack — Essential for getting those crispy edges. If you don’t have one, let the cookies cool on the baking sheet for 5 minutes, then transfer to a plate.
- Cookie scoop (optional but helpful) — A 1.5-tablespoon scoop gives you uniform cookies every time.
If you don’t have a stand mixer, don’t worry. I made these cookies for years with just a hand mixer and a strong arm. The key is just to cream the butter and sugar really well — that’s where the texture comes from.
Preparation Method
- Preheat your oven to 375°F (190°C). Line two baking sheets with parchment paper or silicone mats. While the oven heats up, crush your peppermint bark. Place it in a Ziploc bag and whack it with a rolling pin or heavy pan until you have a mix of fine crumbs and small chunks. (Don’t pulverize it completely — you want some texture.) Set aside.
- Cream the butter and sugars together. In a large bowl, beat the softened butter, granulated sugar, and brown sugar together on medium speed for about 2-3 minutes until light and fluffy. Scrape down the sides of the bowl halfway through. This step is crucial — properly creamed butter and sugar create air pockets that give you soft, tender cookies.
- Add the eggs and vanilla. Beat in the eggs one at a time, making sure each is fully incorporated before adding the next. Then mix in the vanilla extract. The mixture should look smooth and slightly glossy at this point. If it looks curdled, your eggs might have been too cold — don’t panic, it’ll still work.
- Mix the dry ingredients. In a separate bowl, whisk together the flour, baking soda, and salt. Make sure there are no lumps — the baking soda especially needs to be evenly distributed.
- Combine wet and dry ingredients. Gradually add the dry ingredients to the wet mixture, mixing on low speed just until combined. Stop as soon as you don’t see any more flour streaks. Overmixing at this stage develops gluten, which makes cookies tough. (I learned this the hard way after a batch of hockey pucks back in 2019.)
- Fold in the mix-ins. Using a rubber spatula, gently fold in the chocolate chips and crushed peppermint bark. Reserve about 1/4 cup of the mix-ins to press onto the tops of the cookies before baking — this makes them look bakery-level pretty.
- Scoop the dough. Drop rounded tablespoons of dough (about 1.5 tablespoons each) onto the prepared baking sheets, spacing them about 2 inches apart. I usually get about 24 cookies from this recipe. Press a few extra chocolate chips and peppermint pieces onto the tops of each dough ball — this is that little touch that makes people think you’re a pro.
- Bake. Bake for 9-11 minutes, rotating the pans halfway through. The edges should be golden brown and the centers should look slightly underdone and puffy. They’ll continue cooking on the hot pan after you take them out. For softer cookies, go with 9 minutes. For crispier edges, push it to 11.
- Cool. Let the cookies cool on the baking sheet for 5 minutes — this is important because they’re fragile right out of the oven. Then transfer them to a wire rack to cool completely. If you try to move them too soon, they’ll fall apart. (Ask me how I know.)
- Repeat. If you’re baking in batches, make sure your baking sheets are completely cool before putting more dough on them. Warm pans cause the dough to spread too much. I just run mine under cold water and dry them off between batches.
One more thing — your kitchen is going to smell amazing. Like a candy cane and chocolate factory exploded in the best possible way. Enjoy it.
Cooking Tips & Techniques
Here’s the thing about peppermint bark in cookies — it can be a little tricky. The first time I made these, I used really finely crushed bark and it basically dissolved into the dough. You couldn’t see any red and white pieces at all. Pretty, they were not. So here’s what I learned: leave some chunks. Aim for pieces about the size of a pea. That way you get visible candy cane bits AND that melted white chocolate swirl throughout.
Another mistake I made? Using cheap peppermint bark. The kind from the dollar store tastes mostly like artificial mint and wax. Splurge a little here — good-quality bark makes a huge difference in both flavor and texture. I’ve had great luck with the Ghirardelli peppermint bark squares you can find at Target.
Timing-wise, here’s my strategy: I crush the peppermint bark first, then measure out all my other ingredients. That way the butter has time to soften while I’m prepping. If you forgot to take the butter out ahead of time (which I do about 80% of the time), cut it into small cubes and let it sit for 15 minutes — it’ll soften faster.
For consistent cookies, use a cookie scoop. I know it seems fussy, but it gives you uniform size, which means they all bake evenly. No more burnt edges on the small ones and raw middles on the big ones.
One last thing — if you’re making these for a party, you can prep the dough a day ahead. Just scoop it onto a baking sheet, freeze until solid, then transfer to a Ziploc bag. Bake straight from frozen, adding 1-2 minutes to the bake time. Fresh cookies whenever you want them!
Variations & Adaptations
This recipe is super flexible. Here are some variations I’ve tried and loved:
- Dark Chocolate Lovers Version: Swap the semi-sweet chips for dark chocolate (60-70% cacao) and use dark chocolate peppermint bark. The bitterness of the dark chocolate balances the sweetness of the candy perfectly.
- Gluten-Free Adaptation: Use a 1:1 gluten-free baking flour blend. I’ve tested this with King Arthur Measure for Measure and the texture was almost identical to the original. Just don’t overmix the dough.
- Double Peppermint Punch: Add 1/4 teaspoon peppermint extract to the dough along with the vanilla. This gives you that cool, minty flavor throughout, not just in the bark pieces. Be careful though — peppermint extract is strong. A little goes a long way.
- White Chocolate Raspberry Twist: Swap the chocolate chips for white chocolate chips and fold in 1/2 cup freeze-dried raspberries along with the peppermint bark. The tartness of the raspberries cuts through all that sweetness beautifully.
- Mint Chocolate Chip Style: Use mini chocolate chips instead of regular-sized ones and add 1/2 cup of Andes mint pieces along with the peppermint bark. It’s like eating a cookie version of that classic ice cream flavor.
I personally love the dark chocolate version for adult gatherings — it feels a little more sophisticated. But for cookie swaps with kids around, the original version is always the first to disappear.
Serving & Storage Suggestions
These cookies are best served at room temperature — that’s when the texture is just right: chewy in the middle, crisp at the edges. If you’re serving them at a party, arrange them on a festive platter with a few sprigs of fresh mint or rosemary for a pop of green. It sounds silly, but that little touch makes them look so much more intentional.
For drinks, these cookies pair beautifully with a hot cup of coffee, a cold glass of milk, or even a peppermint mocha if you’re feeling extra festive. At my holiday parties, I set up a cookie station with these alongside a pitcher of eggnog — it’s always a hit.
Storage-wise, keep them in an airtight container at room temperature for up to 5 days. Layer them between sheets of parchment paper to prevent sticking. Do NOT refrigerate them — the fridge dries out cookies and makes them lose that soft texture.
For freezing, these cookies freeze like a dream. Place them in a single layer in a freezer-safe container with parchment between layers. They’ll keep for up to 3 months. To thaw, just leave them on the counter for about 30 minutes. The peppermint flavor actually mellows and melds together after freezing, which some people prefer.
One thing I’ve noticed — these cookies actually taste even better the next day. The flavors have time to settle and the peppermint gets a little more subtle. So don’t stress about making them fresh the day of your party. Bake them a day ahead and thank me later.
Nutritional Information & Benefits
Here’s the honest truth — these are indulgent cookies, not health food. But that doesn’t mean they can’t fit into a balanced lifestyle. Here’s the approximate nutritional breakdown per cookie (based on 24 cookies):
- Calories: 210
- Fat: 11g
- Carbohydrates: 28g
- Sugar: 18g
- Protein: 3g
- Fiber: 1g
On the bright side, dark chocolate (if you use it) contains antioxidants called flavonoids, which are good for heart health. Peppermint has been shown to aid digestion — which is handy after a heavy holiday meal. And let’s be real, the joy of sharing something delicious with people you love has its own kind of nutritional value, right?
If you’re watching your sugar intake, you can reduce the granulated sugar to 1/2 cup and use dark chocolate chips — the cookies will still be sweet enough, just less cloying. For a lower-fat version, substitute half the butter with unsweetened applesauce. The texture will be a little more cake-like, but still tasty.
Potential allergens: These cookies contain wheat, dairy, and eggs. If you have nut allergies, check your peppermint bark label — some brands are processed in facilities that also handle tree nuts.
Conclusion
These peppermint bark chocolate chip cookies are the kind of recipe that makes you look like a hero with almost no effort. They’re festive without being fussy, indulgent without being over-the-top, and they have that nostalgic holiday flavor that everyone craves this time of year. Whether you’re bringing them to a cookie swap, serving them at a dinner party, or just baking them for a cozy night in, they deliver every single time.
I love this recipe because it reminds me that you don’t need to spend hours in the kitchen or hunt down obscure ingredients to create something truly special. Sometimes the best recipes come from a little bit of panic, a lot of chocolate, and the willingness to try something on a whim. That’s what the holidays are about, right? A little chaos, a lot of sweetness, and sharing it all with the people who matter.
So go ahead — grab that box of peppermint bark, preheat your oven, and make these cookies. I promise you won’t regret it. And when someone asks for the recipe (because they will), just smile and say you threw it together at the last minute. Your secret’s safe with me.
Have you tried these cookies? I’d love to hear how they turned out! Drop a comment below and let me know what variations you tried, or tag me in your photos on social media. Happy baking, friends!
Frequently Asked Questions
Can I use candy canes instead of peppermint bark?
Yes, but the texture will be different. Candy canes are pure hard candy, so they don’t melt as nicely into the dough. If you’re using candy canes, crush them into fine pieces and mix them with a little melted white chocolate before adding to the dough. That gives you a closer result to actual peppermint bark.
Why did my cookies spread too much?
This usually happens for one of three reasons: your butter was too soft or melted, your dough was too warm when it went into the oven, or you used too little flour. Make sure your butter is just softened, not greasy, and chill the dough balls for 15 minutes if your kitchen is warm. Also, spoon and level your flour — don’t scoop directly from the bag.
Can I make the dough ahead of time?
Absolutely. You can refrigerate the dough for up to 3 days, or freeze the scooped dough balls for up to 3 months. If baking from frozen, add 1-2 minutes to the bake time. No need to thaw first.
How do I get the pretty cracked tops like bakery cookies?
The secret is slightly underbaking them. Take them out when the edges are set but the centers still look a little puffy and underdone. The residual heat from the pan finishes the cooking process, and as they cool, the tops crack naturally. Also, pressing extra chocolate chips and peppermint pieces onto the tops before baking gives them that professional look.
Can I double this recipe?
Yes! This recipe doubles beautifully. Just make sure you have enough baking sheets to avoid overcrowding. If you’re using a stand mixer, the doubled batch will fill it about 3/4 full, which is fine. For a hand mixer, you might want to mix the dough in two batches to avoid straining the motor.
Pin This Recipe!

Best Peppermint Bark Chocolate Chip Cookies Holiday Recipe

These peppermint bark chocolate chip cookies are the ultimate holiday showstopper. They combine rich, melty chocolate with cool, crunchy peppermint for a festive treat that comes together in under 30 minutes.
- Prep Time: 15 minutes
- Cook Time: 10 minutes
- Total Time: 25 minutes
- Yield: 24 cookies 1x
- Category: Dessert
- Cuisine: American
Ingredients
- 1 cup (2 sticks) unsalted butter, softened
- 3/4 cup granulated sugar
- 3/4 cup packed light brown sugar
- 2 large eggs, room temperature
- 1 teaspoon vanilla extract
- 2 1/4 cups all-purpose flour
- 1 teaspoon baking soda
- 1/2 teaspoon salt
- 1 1/2 cups semi-sweet chocolate chips
- 1 1/2 cups crushed peppermint bark
- Optional: 1/2 cup white chocolate chips
Instructions
- Preheat your oven to 375°F (190°C). Line two baking sheets with parchment paper or silicone mats. Crush the peppermint bark in a Ziploc bag with a rolling pin or heavy pan until you have a mix of fine crumbs and small chunks. Set aside.
- In a large bowl, cream the softened butter, granulated sugar, and brown sugar together on medium speed for 2-3 minutes until light and fluffy. Scrape down the sides of the bowl halfway through.
- Beat in the eggs one at a time, ensuring each is fully incorporated before adding the next. Mix in the vanilla extract until the mixture is smooth and slightly glossy.
- In a separate bowl, whisk together the flour, baking soda, and salt until no lumps remain.
- Gradually add the dry ingredients to the wet mixture, mixing on low speed just until combined. Do not overmix.
- Using a rubber spatula, gently fold in the chocolate chips and crushed peppermint bark. Reserve about 1/4 cup of the mix-ins to press onto the tops of the cookies before baking.
- Drop rounded tablespoons of dough (about 1.5 tablespoons each) onto the prepared baking sheets, spacing them about 2 inches apart. Press a few extra chocolate chips and peppermint pieces onto the tops of each dough ball.
- Bake for 9-11 minutes, rotating the pans halfway through. The edges should be golden brown and the centers should look slightly underdone and puffy.
- Let the cookies cool on the baking sheet for 5 minutes, then transfer them to a wire rack to cool completely.
- Repeat with remaining dough, ensuring baking sheets are completely cool before adding more dough.
Notes
For best results, leave some pea-sized chunks of peppermint bark for visible candy cane bits and melted white chocolate swirls. Use good-quality peppermint bark for better flavor. Cookies taste even better the next day. Store in an airtight container at room temperature for up to 5 days. Freeze for up to 3 months.
Nutrition
- Serving Size: 1 cookie
- Calories: 210
- Sugar: 18
- Sodium: 120
- Fat: 11
- Saturated Fat: 7
- Carbohydrates: 28
- Fiber: 1
- Protein: 3
Keywords: peppermint bark cookies, chocolate chip cookies, holiday cookies, Christmas cookies, peppermint cookies, easy cookie recipe


