Love this? Save it for later!
Share the inspiration with your friends
My buddy Marcus watched me lay out three separate bowls of salsa, guac, and queso on the coffee table last Super Bowl Sunday. He didn’t say anything at first. Then he just shook his head, grabbed a huge wooden cutting board from my kitchen island, and started rearranging everything. “You’re making people work too hard,” he said, sliding tortilla chips into a massive pile in the center. “Football food should be one-bite, one-reach, one-crunch territory.”
Honestly, I thought he was crazy. I mean, I had a system! The dips were perfectly separated, the toppings were in little ramekins, and everything looked neat and organized. But by the third quarter, I saw what he meant. People were juggling plates, reaching across each other, and missing plays because they were building individual nacho plates. So I let him take over, and what he created was pure chaos—but the kind of chaos that works.
That night, the Ultimate Loaded Nacho Football Charcuterie Board was born. It’s not pretty in a traditional sense. It’s messy, piled high, and absolutely glorious. The chips get a little soggy in the best way possible, the cheese pulls across the entire board, and everyone just grabs and goes. No plates needed. No fussing. Just pure, unapologetic snacking while you yell at the TV.
Maybe you’ve been there—spending more time assembling individual plates than actually watching the game. Trust me, this board changes everything. It’s the kind of spread that makes people gather around, talk trash, and reach for just one more chip even when they’re full. And honestly? That’s exactly what game day food should do.
Why You’ll Love This Recipe
Let me tell you why this board has become my go-to for every football gathering. First off, the setup takes maybe 20 minutes, which is a miracle when you’re trying to get snacks ready before kickoff. I’ve tested this for years now, tweaking the layering and the ratios, and I can confidently say this version hits every single note.
- Quick & Easy : Comes together in under 30 minutes, perfect for last-minute game day cravings or unexpected guests showing up.
- Simple Ingredients : You probably already have most of this stuff in your pantry. No fancy grocery trips required.
- Perfect for Football Season : Great for Super Bowl parties, Sunday afternoon games, or even Monday night matchups with the crew.
- Crowd-Pleaser : I’ve served this to picky eaters, health-conscious friends, and serious snackers—everyone goes back for seconds.
- Unbelievably Delicious : The combo of warm, melty cheese, crispy chips, cool sour cream, and fresh toppings is next-level comfort food.
What makes this board different from every other nacho platter out there? It’s the layering strategy. Most people just dump chips and toppings on a board and call it done. But I’ve learned that you need to build in stages—chips, cheese, beans, more chips, more cheese, then the cold toppings right before serving. This way, every single chip gets some love, not just the ones on top.
This recipe isn’t just good—it’s the kind that makes you close your eyes after the first bite. The crunch, the creaminess, the little kick of heat from the jalapeños. It’s comfort food reimagined for a crowd, with all the soul-soothing satisfaction of classic nachos but in a shareable, stress-free format. Perfect for impressing your friends without spending the whole game in the kitchen.
What Ingredients You Will Need
This recipe uses simple, everyday ingredients to deliver big flavor and satisfying texture without the fuss. Most of these are pantry staples or easy to find at any grocery store.
- For the base:
- 1 large bag (13-16 oz) restaurant-style tortilla chips (I prefer Tostitos Scoops for maximum topping holding)
- 1 can (15 oz) refried beans, warmed
- 2 cups shredded Mexican blend cheese (or cheddar-jack mix)
- 1 cup shredded pepper jack cheese (adds a nice kick)
- For the warm toppings:
- 1 lb ground beef (80/20 works great)
- 1 packet taco seasoning (or homemade: chili powder, cumin, garlic powder, paprika)
- 1/2 cup water
- 1 can (4 oz) diced green chiles, drained
- 1/2 cup pickled jalapeños, drained
- For the cold toppings:
- 1 cup sour cream
- 1 cup guacamole (store-bought or homemade)
- 1 cup pico de gallo or fresh salsa
- 1/2 cup sliced black olives
- 1/4 cup chopped fresh cilantro
- 1/4 cup sliced green onions
- 1-2 fresh jalapeños, thinly sliced (optional, for extra heat)
- Optional add-ins:
- 1 cup cooked black beans or pinto beans
- 1/2 cup corn kernels (fresh, canned, or frozen and thawed)
- 1/4 cup cotija cheese, crumbled
- Lime wedges for squeezing
Pro tip: When picking your ground beef, go for 80/20. The extra fat means more flavor, and it browns up beautifully. If you’re using a leaner blend, add a splash of oil to the pan. For the beans, I like Rosarita refried beans—they’re smooth and spreadable. And honestly, don’t skip the pickled jalapeños. They add a tangy heat that fresh ones just can’t match.
If you’re feeding a crowd with dietary needs, swap the ground beef for seasoned lentils or plant-based crumbles. Use dairy-free cheese and vegan sour cream for a fully plant-based board. The beauty of this recipe is how flexible it is.
Equipment Needed
You don’t need anything fancy for this board, which is part of why I love it. Here’s what you’ll need:
- Large wooden cutting board or serving platter (at least 18 inches long)
- Large skillet for cooking the ground beef
- Small saucepan for warming the refried beans
- Small bowls for sour cream, guacamole, and salsa
- Spatula for spreading and stirring
- Cheese grater (if shredding your own cheese)
- Paper towels for lining the board (optional, makes cleanup easier)
If you don’t have a huge wooden board, use a rimmed baking sheet or even a large pizza pan. I’ve used a clean plastic cutting board in a pinch, and it worked fine. Honestly, the presentation matters less than the function. Just make sure whatever you use has a slight lip to catch any runaway cheese or beans.
One tip: If you’re using a wooden board for the first time, line it with parchment paper or foil. It makes cleanup a breeze, and you won’t have to scrub greasy cheese off the wood grain. Learned that one the hard way, let me tell you.
Preparation Method
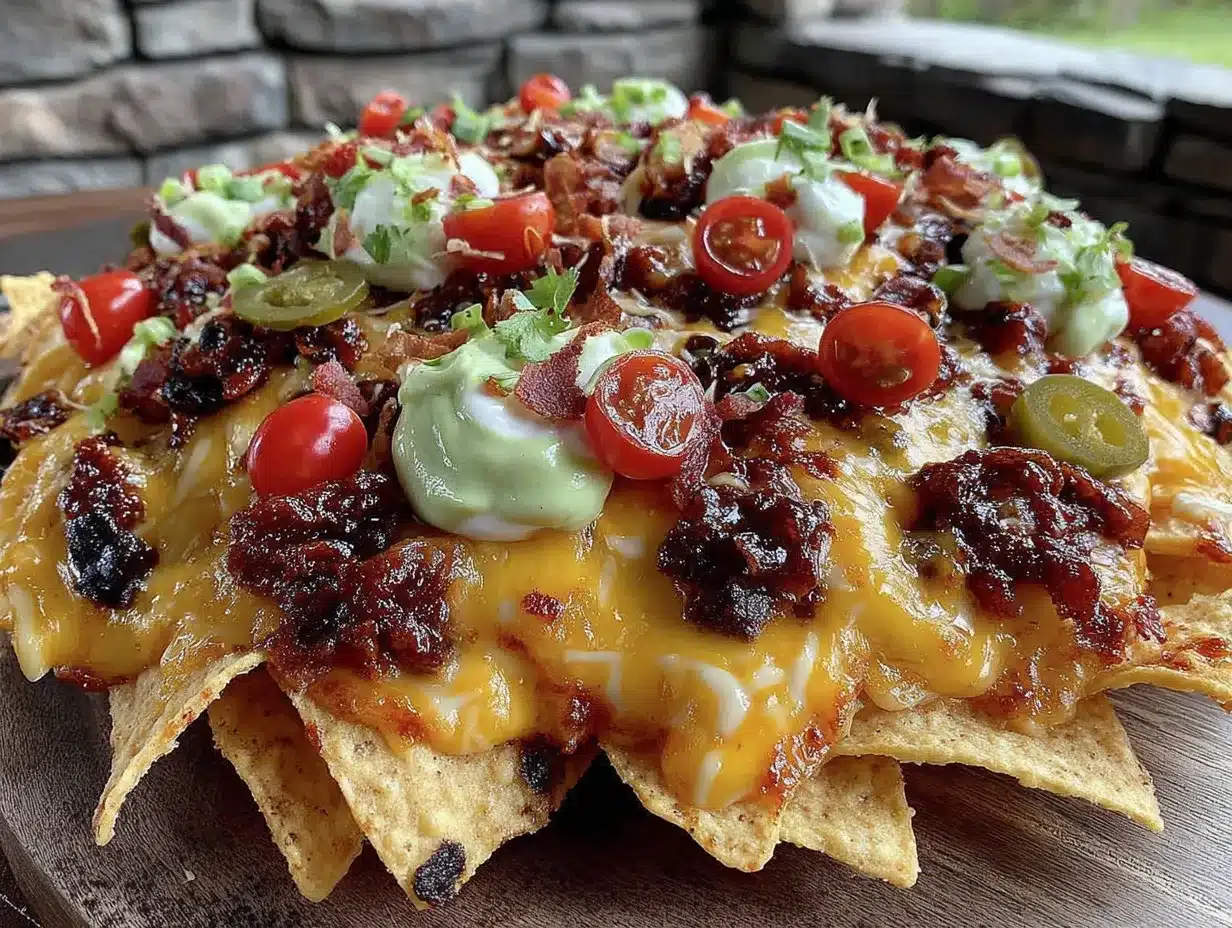
Alright, let’s build this board. Follow these steps, and you’ll have a masterpiece ready before the pre-game show ends.
- Preheat your oven to 375°F (190°C). You’ll need it to melt the cheese and warm everything through.
- Cook the ground beef. Heat a large skillet over medium-high heat. Add the ground beef and break it apart with a spatula. Cook for 6-8 minutes until browned and no longer pink. Drain off excess grease if needed. Add the taco seasoning and 1/2 cup water. Stir and let it simmer for 2-3 minutes until thickened. Set aside.
- Warm the refried beans. In a small saucepan over low heat, warm the refried beans, stirring occasionally. If they’re too thick, add a tablespoon of water to loosen them up. You want them spreadable, not runny.
- Prepare your board. Line your large cutting board or baking sheet with parchment paper if desired. Start by spreading a thin layer of refried beans directly on the board in a large oval shape. This creates a base that holds everything together.
- Layer the chips. Arrange a generous layer of tortilla chips over the beans, pressing them down slightly so they stick. Don’t be shy—use about half the bag for the first layer.
- Add the meat and cheese. Sprinkle half the seasoned ground beef over the chips. Then scatter half the shredded Mexican blend cheese and half the pepper jack cheese over the meat. Add the diced green chiles and pickled jalapeños evenly across the board.
- Repeat the layers. Add another layer of chips, the remaining ground beef, and the rest of the cheese. This double-layering ensures every chip gets some goodness, not just the ones on top.
- Bake the board. Place the entire board in the preheated oven (if it’s oven-safe) for 10-12 minutes, until the cheese is fully melted and bubbly. If your board isn’t oven-safe, use a baking sheet and transfer back to the board afterward.
- Add cold toppings. Remove from the oven and let it cool for 2-3 minutes. Dollop the sour cream, guacamole, and pico de gallo in separate sections on the board. Sprinkle with sliced black olives, fresh cilantro, green onions, and fresh jalapeño slices if using.
- Serve immediately. Place the board in the center of the table with extra chips on the side. Watch it disappear.
Here’s a little trick I learned: If you want the cheese extra gooey, broil the board for the last 2 minutes of baking. Keep an eye on it though—broilers work fast, and burnt cheese is sad cheese.
Cooking Tips & Techniques
I’ve ruined more nacho boards than I care to admit, so let me save you some trouble. The biggest mistake people make is putting cold toppings on before baking. Sour cream and guacamole get warm and watery, and nobody wants that. Always add them after the board comes out of the oven.
Another tip: Don’t overload the board with chips. I know it’s tempting to pile them high, but too many chips means uneven melting and sad, naked chips at the bottom. Two layers is the sweet spot. Trust me on this one.
Timing is everything with this board. Cook the ground beef and warm the beans while the oven preheats. Assemble the board in about 5 minutes, bake, and use that time to prep your cold toppings. By the time the cheese is bubbly, everything else is ready to go. It’s a beautiful dance of multitasking.
One thing I’ve learned from my failures: If you’re using a wooden board that isn’t heat-safe, assemble the layers on a baking sheet, bake it, then slide the whole thing onto the board for serving. It’s a little extra work, but it saves your board from warping or cracking.
For consistency, use room temperature sour cream and guacamole. Cold toppings straight from the fridge can make the warm chips cool down too fast. Let them sit out for 10 minutes before assembling.
Variations & Adaptations
This board is endlessly customizable, which is why I make it so often. Here are a few variations I’ve tried and loved:
- Vegetarian Version : Skip the ground beef and double up on black beans, pinto beans, and roasted corn. Add sautéed bell peppers and onions for extra texture. Honestly, I sometimes prefer this version—it feels lighter but still satisfying.
- Spicy Fiesta Board : Add chorizo instead of ground beef, use habanero cheddar, and top with sliced serrano peppers. Drizzle with hot honey before serving. This one’s for the heat seekers.
- Breakfast Nacho Board : Swap the ground beef for crispy bacon and breakfast sausage. Add scrambled eggs and a drizzle of queso. Serve with salsa verde. Perfect for a lazy Sunday morning game.
- Seafood Twist : Use seasoned shrimp or blackened fish instead of beef. Top with mango salsa and a creamy chipotle sauce. It’s unexpected but absolutely delicious.
For dietary adaptations, use gluten-free tortilla chips (most are naturally gluten-free, but check the label). For a lower-carb option, use pork rinds or bell pepper strips as the base. I’ve tried both, and while it’s not the same experience, it scratches the nacho itch without the carbs.
My personal favorite variation? I add a layer of roasted sweet potatoes under the chips. It sounds weird, but the sweetness balances the spice perfectly. I stumbled on this by accident when I had leftover roasted sweet potatoes, and now I do it on purpose.
Serving & Storage Suggestions
Serve this board immediately while the cheese is still warm and stretchy. I like to place it in the center of the table with small plates and napkins, but honestly, most people just grab chips directly. That’s the beauty of it.
For presentation, arrange the cold toppings in little piles around the board rather than mixing everything together. It looks prettier and lets people customize each bite. Add lime wedges on the side for squeezing—it brightens up all the flavors.
Pair this board with ice-cold beers, margaritas, or a simple lime soda. For a full spread, serve alongside a simple side salad or fresh fruit to balance the richness. I always put out a bowl of fresh veggies too, just to pretend we’re being healthy.
Storage? Honestly, this board is best eaten fresh. But if you have leftovers (unlikely, but possible), scrape everything into an airtight container and refrigerate for up to 2 days. To reheat, spread the leftovers on a baking sheet and warm in a 350°F oven for 5-7 minutes. Don’t microwave it—the chips turn into sad, chewy sadness.
The flavors actually meld together overnight in a weirdly delicious way. The chips get soft, but the seasoned beef and beans infuse everything. It’s not the same as fresh, but it’s still pretty tasty.
Nutritional Information & Benefits
Let’s be real—this is indulgent food, and that’s okay. Here’s an estimated breakdown per serving (about 1/8 of the board):
- Calories: 450-550
- Protein: 22g
- Fat: 28g
- Carbohydrates: 38g
- Fiber: 6g
- Sugar: 4g
- Sodium: 900mg
Now, the good news: This board actually has some nutritional perks. The beans provide fiber and plant-based protein. The avocado in the guacamole offers healthy monounsaturated fats. The tomatoes and peppers are packed with vitamin C and antioxidants. And the cheese gives you calcium and protein.
For dietary considerations, this recipe contains dairy and gluten (in the chips). Use gluten-free chips and dairy-free cheese for a modified version. The ground beef can be swapped for plant-based alternatives to make it vegetarian or vegan.
My personal philosophy? Food like this is about connection and enjoyment, not perfection. One board won’t derail your health goals, and the joy of sharing it with people you love is its own kind of nourishment. Balance is key, and this board fits perfectly into a balanced life.
Conclusion
This Ultimate Loaded Nacho Football Charcuterie Board is more than just a snack—it’s the centerpiece of game day memories. It’s the board that gets people talking, laughing, and reaching for just one more chip. The layered build ensures every bite is packed with flavor, and the customizable toppings mean everyone gets exactly what they want.
I love this recipe because it takes the stress out of hosting. No individual plates, no complicated assembly, no last-minute panic. Just a gorgeous, messy, delicious board that does all the work for you. Whether you’re hosting the Super Bowl or just a casual Sunday game, this board delivers every single time.
Now I want to hear from you! What toppings would you add to your ultimate nacho board? Drop a comment below and share your favorite variations. And if you make this for your next game day, tag me in your photos—I love seeing your creations. Until next time, happy snacking and enjoy the game!
Frequently Asked Questions
Can I make this board ahead of time?
You can prep the components ahead—cook the ground beef, warm the beans, and chop the toppings—but assemble and bake the board just before serving. The chips get soggy if they sit too long with the warm toppings.
What’s the best way to keep the board warm during a long game?
If you’re worried about it cooling down, use a rimmed baking sheet and place it on a warming tray or in a low oven (200°F) for up to 30 minutes. Just add the cold toppings right before serving.
Can I use pre-shredded cheese?
You can, but freshly shredded cheese melts much better. Pre-shredded cheese has anti-caking agents that prevent it from getting as gooey and stretchy. If you’re in a pinch, it works fine—just know the texture won’t be quite as dreamy.
How do I adjust the spice level?
For a milder board, use mild cheddar instead of pepper jack, skip the pickled jalapeños, and use a mild salsa. For extra heat, add habanero sauce, fresh serranos, or a drizzle of hot honey.
What if I don’t have a large board or baking sheet?
No problem! Use two smaller boards or plates. You can even use a clean pizza pan or a large cast iron skillet. The key is having enough surface area to spread everything out in a single layer.
Pin This Recipe!
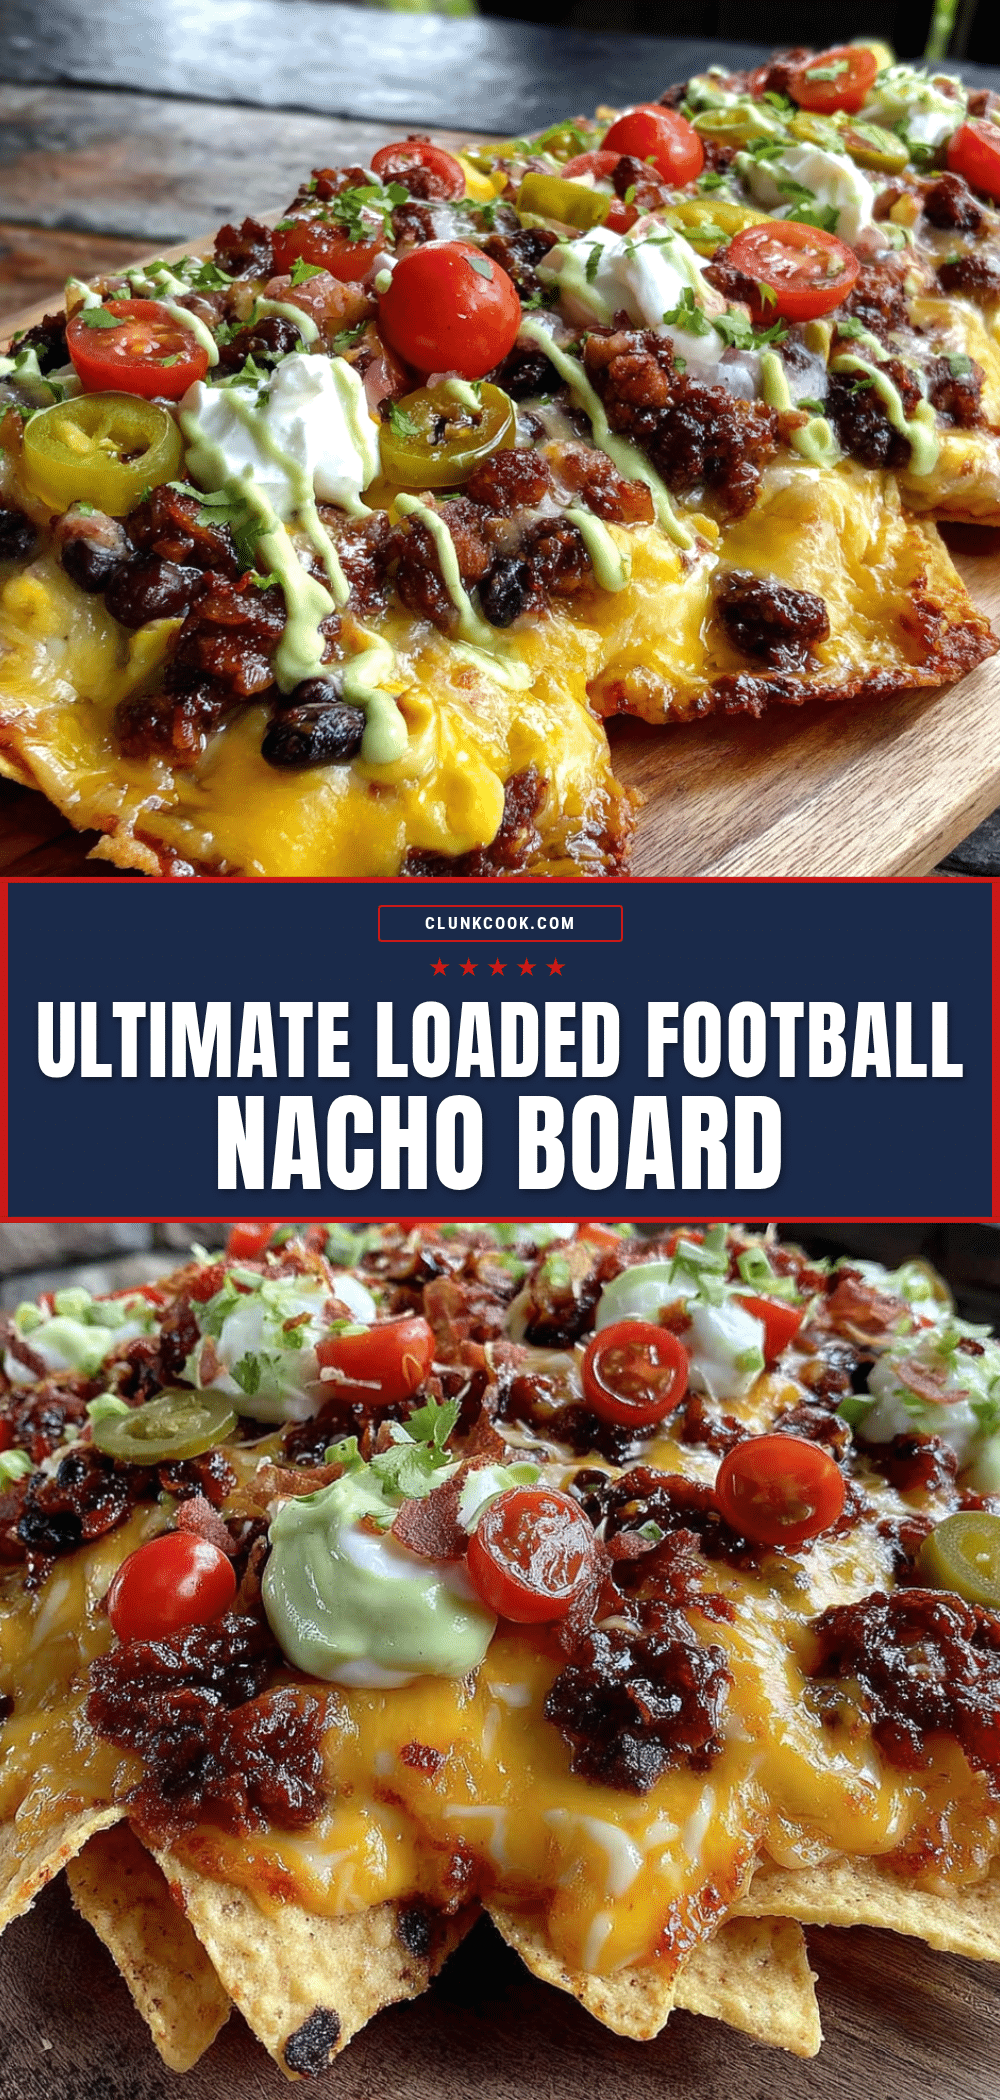
Ultimate Loaded Nacho Football Charcuterie Board
A messy, piled-high nacho board perfect for game day. Layers of crispy tortilla chips, seasoned ground beef, refried beans, melted cheese, and fresh toppings create a shareable, one-bite snack that keeps everyone gathered around the TV.
- Prep Time: 20 minutes
- Cook Time: 15 minutes
- Total Time: 35 minutes
- Yield: 8 servings 1x
- Category: Appetizer
- Cuisine: Mexican-American
Ingredients
- 1 large bag (13–16 oz) restaurant-style tortilla chips (e.g., Tostitos Scoops)
- 1 can (15 oz) refried beans, warmed
- 2 cups shredded Mexican blend cheese
- 1 cup shredded pepper jack cheese
- 1 lb ground beef (80/20)
- 1 packet taco seasoning
- 1/2 cup water
- 1 can (4 oz) diced green chiles, drained
- 1/2 cup pickled jalapeños, drained
- 1 cup sour cream
- 1 cup guacamole
- 1 cup pico de gallo or fresh salsa
- 1/2 cup sliced black olives
- 1/4 cup chopped fresh cilantro
- 1/4 cup sliced green onions
- 1–2 fresh jalapeños, thinly sliced (optional)
- 1 cup cooked black beans or pinto beans (optional)
- 1/2 cup corn kernels (optional)
- 1/4 cup cotija cheese, crumbled (optional)
- Lime wedges for squeezing (optional)
Instructions
- Preheat oven to 375°F (190°C).
- Cook the ground beef: Heat a large skillet over medium-high heat. Add ground beef and cook for 6-8 minutes until browned. Drain excess grease. Add taco seasoning and 1/2 cup water. Simmer for 2-3 minutes until thickened. Set aside.
- Warm the refried beans in a small saucepan over low heat, stirring occasionally. Add a tablespoon of water if too thick.
- Line a large cutting board or baking sheet with parchment paper (optional). Spread a thin layer of refried beans in a large oval shape on the board.
- Arrange a generous layer of tortilla chips over the beans, pressing down slightly. Use about half the bag.
- Sprinkle half the seasoned ground beef over the chips. Scatter half the Mexican blend cheese and half the pepper jack cheese. Add diced green chiles and pickled jalapeños evenly.
- Repeat layers: add remaining chips, ground beef, and cheeses.
- Bake the board (if oven-safe) for 10-12 minutes until cheese is melted and bubbly. If board is not oven-safe, use a baking sheet and transfer after baking.
- Remove from oven and let cool for 2-3 minutes. Dollop sour cream, guacamole, and pico de gallo in separate sections. Sprinkle with black olives, cilantro, green onions, and fresh jalapeño slices.
- Serve immediately with extra chips on the side.
Notes
For extra gooey cheese, broil the board for the last 2 minutes of baking. Always add cold toppings after baking to avoid watery results. If using a wooden board that isn’t oven-safe, assemble on a baking sheet, bake, then slide onto the board for serving. Leftovers can be refrigerated for up to 2 days and reheated in a 350°F oven for 5-7 minutes.
Nutrition
- Serving Size: 1/8 of board
- Calories: 500
- Sugar: 4
- Sodium: 900
- Fat: 28
- Saturated Fat: 12
- Carbohydrates: 38
- Fiber: 6
- Protein: 22
Keywords: nachos, charcuterie board, game day, football, loaded nachos, party snack, Super Bowl