Easy No-Bake Peanut Butter Granola Bars Perfect for Lunchboxes
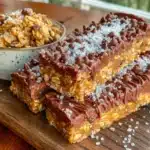
These easy no-bake peanut butter granola bars are a lifesaver for busy parents and snack lovers. Made with simple pantry ingredients, they come together in minutes and are perfect for lunchboxes, post-workout snacks, or a wholesome treat.
- Prep Time: 15 minutes
- Cook Time: 0 minutes
- Total Time: 2 hours 15 minutes (includes chilling time)
- Yield: 12-16 bars 1x
- Category: Snack
- Cuisine: American
Ingredients
Scale
- 2 cups rolled oats (use certified gluten-free oats if needed; old-fashioned oats work best, not quick oats)
- 1 cup creamy peanut butter (natural peanut butter with no added sugar preferred, but any creamy kind works; avoid the ‘natural’ kind that separates too much unless you stir it well)
- 1/2 cup honey (or maple syrup for a vegan option)
- 1/4 cup unsalted butter (or coconut oil for a dairy-free version)
- 1 teaspoon vanilla extract (pure vanilla adds warmth and depth)
- 1/4 teaspoon salt (skip if your peanut butter is salted)
- 1/3 cup mini chocolate chips (optional; I recommend Enjoy Life brand for allergy-friendly options)
- 1/4 cup unsweetened shredded coconut (optional)
- 1/4 cup chopped peanuts (optional; toast them lightly first for more flavor)
- 2 tablespoons ground flaxseed (optional)
Instructions
- Line your pan. Take an 8×8-inch baking pan and line it with parchment paper, leaving about 2 inches of overhang on two opposite sides. This will act as handles to lift the bars out later. Set the pan aside.
- Combine the wet ingredients. In a small saucepan over low heat, combine 1 cup creamy peanut butter, 1/2 cup honey, and 1/4 cup unsalted butter. Stir constantly with a spatula until the mixture is smooth and fully melted. This should take about 2-3 minutes. Do not let it boil—you just want everything warm and combined. Remove from heat and stir in 1 teaspoon vanilla extract and 1/4 teaspoon salt. The mixture will look glossy and smell amazing.
- Mix the dry ingredients. In a medium mixing bowl, place 2 cups rolled oats. If you are using any mix-ins like chocolate chips or shredded coconut, add them now. Give the dry ingredients a quick stir to distribute everything evenly.
- Combine wet and dry. Pour the warm peanut butter mixture over the oats. Use your spatula to fold everything together until every oat is coated. The mixture will be thick and sticky. Keep folding until no dry patches remain. This takes about a minute of gentle but firm stirring.
- Press into the pan. Transfer the mixture into your prepared pan. Spread it out as evenly as you can with your spatula. Then, place a piece of parchment paper over the top and use the flat bottom of a measuring cup or your hands to press the mixture down firmly. This is the most important step—press hard and evenly. The tighter you pack it, the better the bars will hold together. I usually press for a full minute, making sure the corners are compacted.
- Chill. Place the pan in the refrigerator for at least 2 hours. For best results, chill for 3-4 hours or even overnight. Do not rush this step. If the bars are not fully set, they will crumble when you cut them.
- Cut and serve. Once the bars are firm, lift the parchment paper to remove the block from the pan. Place it on a cutting board. Use a sharp knife to cut into 12-16 bars, depending on how big you want them. Wipe the knife clean between cuts for neat edges. If the bars are too hard straight from the fridge, let them sit at room temperature for 5 minutes before cutting.
Notes
Press the mixture firmly into the pan to ensure bars hold together. Chill for at least 2 hours, preferably 3-4 hours or overnight. For clean cuts, wipe the knife between cuts. Bars can be stored in the refrigerator for up to 2 weeks or frozen for up to 3 months.
Nutrition
- Serving Size: 1 bar
- Calories: 210
- Sugar: 12
- Sodium: 120
- Fat: 11
- Saturated Fat: 3.5
- Carbohydrates: 24
- Fiber: 3
- Protein: 6
Keywords: no-bake granola bars, peanut butter granola bars, lunchbox snacks, easy granola bars, healthy snacks, no-bake snacks